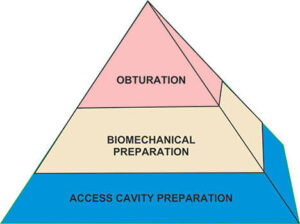
It is a well established fact that success of endodontic therapy depends on the main three factors:
a. Cleaning and shaping
b. Disinfection
c. Three dimensional obturation of the root canal system.
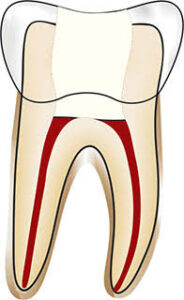
Proper cleaning and shaping establishes the necessary conditions for next two factors. However, there is one step which precedes these factors, the error in this preliminary step would compromise the whole subsequent work. This preliminary step is the preparation of the access cavity, i.e. opening through the coronal portion of tooth which allows localization, cleaning, shaping, disinfection and a three dimensional obturation of the root canal system. Thus we can say that coronal access forms the foundation of pyramid of endodontic treatment .
Pyramid of endodontic treatment
As we have seen success of endodontic therapy depends on proper evaluation and thereafter placement of this step. Any improperly prepared access cavity can impair the instrumentation, disinfection and therefore obturation resulting in decreased prognosis of the treatment.
Before going for access cavity preparation, after evaluating other factors, a study of preoperative periapical radiograph is necessary with a paralleling technique. It helps in knowing:
i. Morphology of the tooth..
ii. Anatomy of root canal system.
iii. Number of canals.
iv. Curvature of branching of the canal system.
v. Length of the canal
vi. Position and size of the pulp chamber and its distance from occlusal surface.
vii. Position of apical foramen.
viii. Calcification, resorption present if any.
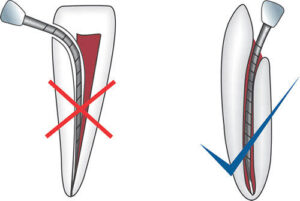
The main objective of the access cavity preparation is to create a smooth, straight line access to the canal system and the apex. The optimal access cavity results in the straight entry into the canal orifices with line angles forming a funnel which drops smoothly into the canals. Sometimes depending upon the location and number of canals, modification of the outline form may be needed.
Smooth,Straight line access to root canal system
An ideal access preparation should have following qualities:
1. An unobstructed view into the canal.
2. A file should pass into the canal without touching any part of the access cavity.
3. No remaining caries should be present in access cavity.
4. Obturating instruments should pass into the canal without touching any portion of the access cavity.
Removal of coronal contacts on instruments reduce the adverse unidirectional forces directed on the instruments which may result in instrumental errors like ledging and perforation .
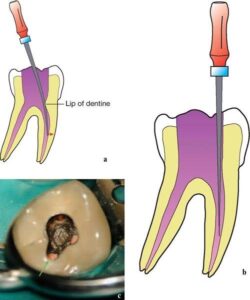
Removal of extra dentine from access opening
Objectives of Access Cavity Preparation :
1. The main objective of access cavity preparation is to gain the direct access to the apical foramen.
2. Remove the entire roof of pulp chamber so that pulp chamber can be debrided.
3. Conserve as much sound tooth structure as possible and as consistent with treatment objectives.
4. Before starting the treatment, must make a three dimensional picture of internal anatomy of tooth.
Guidelines for Access Cavity Preparation:
1. Before starting the access cavity preparation one should check the depth of preparation by aligning the bur and handpiece against the radiograph. This is done so as to note the position and depth of the pulp chamber .
2. Place a safe ended bur in handpiece complete the outline form. The bur is penetrated into the crown until the roof of pulp chamber is penetrated.
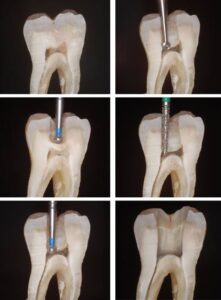
Entry into pulp chamber from round and tapered fissured bur
Commonly recommended access opening bur is round bur, that is to penetrate the pulp chamber. It prevents the overpreparation. Once the “drop in” into the pulp chamber is obtained, round bur is replaced by tapered fissured bur .
One should avoid using flat ended burs which make highly irregular access walls, causing multiple ledges. Round ended carbide burs are used for access opening into cast restorations because they have distinct tactile sense when dropping into the pulp chamber.
Access finishing is best carried out by using burs with safe non-cutting ends. Advantage of using these burs is that they are less likely to damage or perforate the pulp chamber floor. Disadvantages of using these burs are that they can cut laterally and they cannot drop into small orifices to funnel the point of transition between the access cavity and walls.
3. When locating the canal orifices is difficult, one should not apply rubber dam until correct location has been confirmed.
4. Remove all the unsupported tooth structure to prevent tooth fracture during treatment.
5. Remove the chamber roof completely as this will allow the removal of all the pulp tissue, calcifications, caries or any residuals of previous fillings. If pulp chamber is not completely deroofed, it can result in-
a. Contamination of the pulp space.
b. Discoloration of endodontically treated tooth.
6. The walls of pulp chamber are flared and tapered to form a gentle funnel shape with larger diameter towards occlusal surface .
7. Endodontic access cavity is prepared through the occlusal or lingual surface never through proximal or gingival surface. If access cavity as made through wrong entry, it will cause inadequate canal instrumentation resulting iatrogenic errors .
8. Inspect the pulp chamber for determining the location of canals, curvatures, calcifications using well magnification and illumination.
Completely deroof the pulp chamber
Correct position for entering into the pulp chamber
ACCESS CAVITY PREPARATION FOR
MAXILLARY MOLARS :
Though the technique of access cavity preparation of molar is similar to that of anterior teeth and premolar but because
of anatomic differences, they are discussed separately.
Remove all the carious portion or any restoration if present.
Determine the shape and size of access opening by measuring the boundaries of pulp chamber mesially and distally and coronally on the radiograph.
Determine the starting point of bur into the enamel. It is determined by mesial and distal boundary. Mesial boundary is a line joining the mesial cusps and the distal boundary is the oblique ridge. The starting point starting point of bur penetration is on the central groove midway between mesial and distal boundaries .
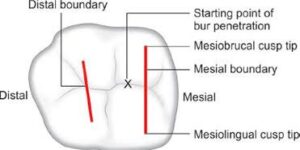
Outline of access cavity of maxillary molars
Now penetrate the enamel with No. 4 round bur in the central groove directed palatally and prepare an external outline form.
Penetrate the bur deep into the dentin until the clinician feels “drop” into the pulp chamber. Now remove the complete roof of pulp chamber using tapered fissure, round bur or safety tip diamond or the carbide bur working from inside to outside. The shape and size of the internal anatomy of pulp chamber guides the cutting.
Explore the canal orifices with sharp endodontic explorer. All the canal orifices should be positioned entirely on the pulp floor and should not extend to the axial walls.
After the canal orifices has been located, remove any cervical bulges, ledges or obstruction if present.
Smoothen and finish the access cavity walls so as to make them confluent within the wall of pulp chamber and slightly divergent towards the occlusal surface.
Maxillary First Molar
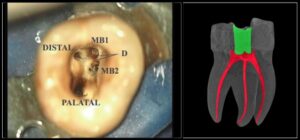
The shape of pulp chamber is rhomboid with acute mesiobuccal angle, obtuse distobuccal angle and palatal right angles .
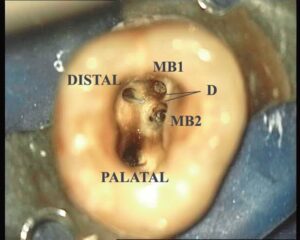
Position of root canal orifices of maxillary first molar
Palatal canal orifice is located palatally. Mesiobuccal canal orifice is located under the mesiobuccal cusp. Distobuccal canal orifice is located slightly distal and palatal to the mesiobuccal orifice.
A line drawn to connect all three orifices (i.e. MB, DB and palatal) forms a triangle, termed as molar triangle.
Almost always a second mesiobuccal canal, i.e. MB, is present in first maxillary molars, which is located palatal and mesial to the MB,. Though its position can vary sometimes it can lie a line between MB, and palatal orifices.
Because of presence of MB2, the access cavity acquires a rhomboid shape with corners corresponding to all the canal orifices, i.e. MB1, MB2, DB and palatal.
Luebke has shown that an entire wall is not extended to search and facilitate cleaning, shaping and obturation of extracanal. He recommended extension of only that portion of the wall where extracanal is present, and this may result in “cloverleaf appearance” in the outline form. Luebke referred this to as a shamrock preparation.